Monday, April 18, 2011

Jude's 1st Birthday { Dr Seuss }


My little Jude the Dude turned ONE!!!

We had such an amazing day yesterday! It was supposed to rain but God heard my prayers and made such a beautiful day. It was a Seusstastic day! I had everything from fun Seuss like tree's to a Dr. Seuss combo Jumper, to fishing for goldfish. Here are a few ideas that made it a Seussical birthday.
 
Invitations: Well these are pretty self explanatory. I made some amazing invites with a FUN poem on photoshop.
Decorations: I bought card board cut out of various Seuss characters from funtocollect.com One of them included a 5' cat in the hat. I also printed various verses that meant a lot to me from some of Dr. Seuss Books. I made the cutest tags that were placed on the cupcakes. I made Seuss like trees with a paint stir stick, a round styrofoam ball and a feather boa. Here are a few pictures of the decorations.
Door

The Tags

The gift Table

Food table & Cake TableREDUCE REUSE RECYCLE
I put this sign up by the recycle trash bag


Games & Activities:

Let's go fishing!
The first game my sister Natalie thought of. Fish for your own goldfish. This was a HUGE hit and all the kids had so much fun catching one, fish, two fish red fish, Blue fish.

The sign had the verse. "Look what we found in the park in the Dark. We will take him home we will name him Clark. He will live at our house he will grow and grow. Will our mother like this? We don't know."

We also had a bouncer that kept the kids busy the WHOLE time. I had a craft all set up but the kids were having so much fun on the bouncer I didn't do it. It was:

Decorate Yertle the turtle.

I printed a bunch of Yertle the turtle heads cut them out and taped them to the side of a paper bowl. Then bought foam shapes and crayons to decorate the shell of Yertle.

Then the Bounce House.... I will never get just a plain bouncer again. The kids LOVED the slide feature on the combo unit.
The Cake: This is where I got WAY to ambitious!! I tried to make Jude's smash cake. I tried to make a cat in the hat, hat. It fell over so I ended up just decorating one single cupcake.

4 HUGE costco cupcakes were sacrificed in the process.

The End result :)Jude wasn't impressed. (ha ha) :)

I bought one box of the HUGE cupcakes from Costco and then made confetti cupcakes for the kiddies.

The Food: I had a grand ideas for this as well but in the end I really didn't want to do themed food. I was going to make green deviled eggs and ham wrapped in cantaloupe. I was going to have rainbow colored goldfish for the kiddies to snack on, Burgers and fries. We did burgers and chips.

The food was AMAZING thanks to my AWESOME dad! Thank you so much!!! we had:
Curly Hot dogs (cut them into fours length wise and boil them till they curl)
Hamburgers
Potato Salad
Cabbage and raman salad (super yummy thanks Jenny for the recipe)
Cut fruit
String cheese,
Chips
6 layer dip
Artichoke Parmesan dip

Birthday Boy's Apparel:

I had his shirt and bibs made on etsy. I requested a custom listing and got a few bids then choose the one that I liked best. I had a shirt made and two bibs. One for Lunch time and one for Cake time.

Then I bought a cat in the hat shirt for after his cake since I knew he would be a mess.

Here are pictures of his shirts and bibs:Birthday Shirt & Cake Bib Made by Cute as a Button Designs
http://www.etsy.com/shop.php?user_id=5692314

Lunch Time Bib made by Karens Monsters
http://www.etsy.com/shop.php?user_id=5288809

You can get this shirt anywhere that sells Dr. Seuss Shirts. I got Jude's on Ebay.

Goody Bags: Well all the kids took home there fish that they caught, with a baggy of fish food and water conditioner and one of Dr. Seuss's classic books with a Dr Seuss Book mark. They had a bunch of books to choose from and bookmarks. I bought them on ebay. All the books were brand new and I paid roughly $2.50 for each. Not too bad.

Then the last two Items that made this SUCH an Amazing Birthday was

FRIENDS and One Happy Birthday Boy who took a 20 minute snooze in his high chair while everyone played.

Oh and to top it all off Jude took his first steps last night after he opened up his gifts.

Actual Birthday photo's to come. My good friend Jenny who is a photographer was so nice and took pictures of this HUGE milestone. Thank you Jenny I can't wait to see pictures.
http://www.jennerrose.com/ if you go to the client area and type in onefish as the password you can see pictures from the day.

WONDER PET'S BIRTHDAY to follow. :)

Sunday, April 17, 2011

Emelia's 1st Birthday { Butterfly Garden Party }

MY SWEET LITTLE BUG IS ONE!!

Invitations: I made these in photoshop. It is really fun to see how much she changed through out one year.

BIRTHDAY ATTIRE: I made the shirt and tutu. 


PARTY DECOR and CUPCAKES:


 FAVORS:

 ACTIVITY:


 The Birthday Girl fell asleep while eating lunch she was just too tired to make it.


Then when everyone sang to her she cried. ha ha


What an awesome birthday for our little Emmy bug!
She loved spending time with all her friends and had a blast!


and I mean a BLAST!!! and I guess mommy and daddy did too...
Check out our video

Friday, April 15, 2011

Earth Day is April 22nd

A few years ago I hosted a playdate at my home to make earth day shirts.

MATERIALS NEEDED
You will need a shirt any color.
brown fabric paint
green fabric paint
flat card board to put inside your shirt so the paint won't bleed through to the back.
and two little hands

and this is what you can make:

Wednesday, April 6, 2011

Sneak Peek at Jude's Vintage Train Birthday Party

As most of my friends know I LOVE birthday parties and I especially love planning them. I start months in advance and typically drive my family crazy with the small little details.

Both my kids birthday's are in May. So planning two big parties has been hard, but this year my daughter decided to have her birthday at the American Girl store so I don't need to do much planning for that, which means I can focus and go all out on my son Jude's 3rd birthday.

Here is a sneak peek at his Vintage Train themed party decorations.

CHOO CHOO ALL ABOARD!

 The invitations that I created in Photoshop. (FRONT)
(BACK)
All the photos taken were by my good friend Jenner Rose Photography

This suit case I purchased from Land of Nod. I painted the inside and then added wooden letters that I decorated with a train scrapbook kit. It will hold all the plates and napkins at the party.

Got all my triangles cut for the pennant banner


Finished Pennant Banner. 


Monday, March 28, 2011

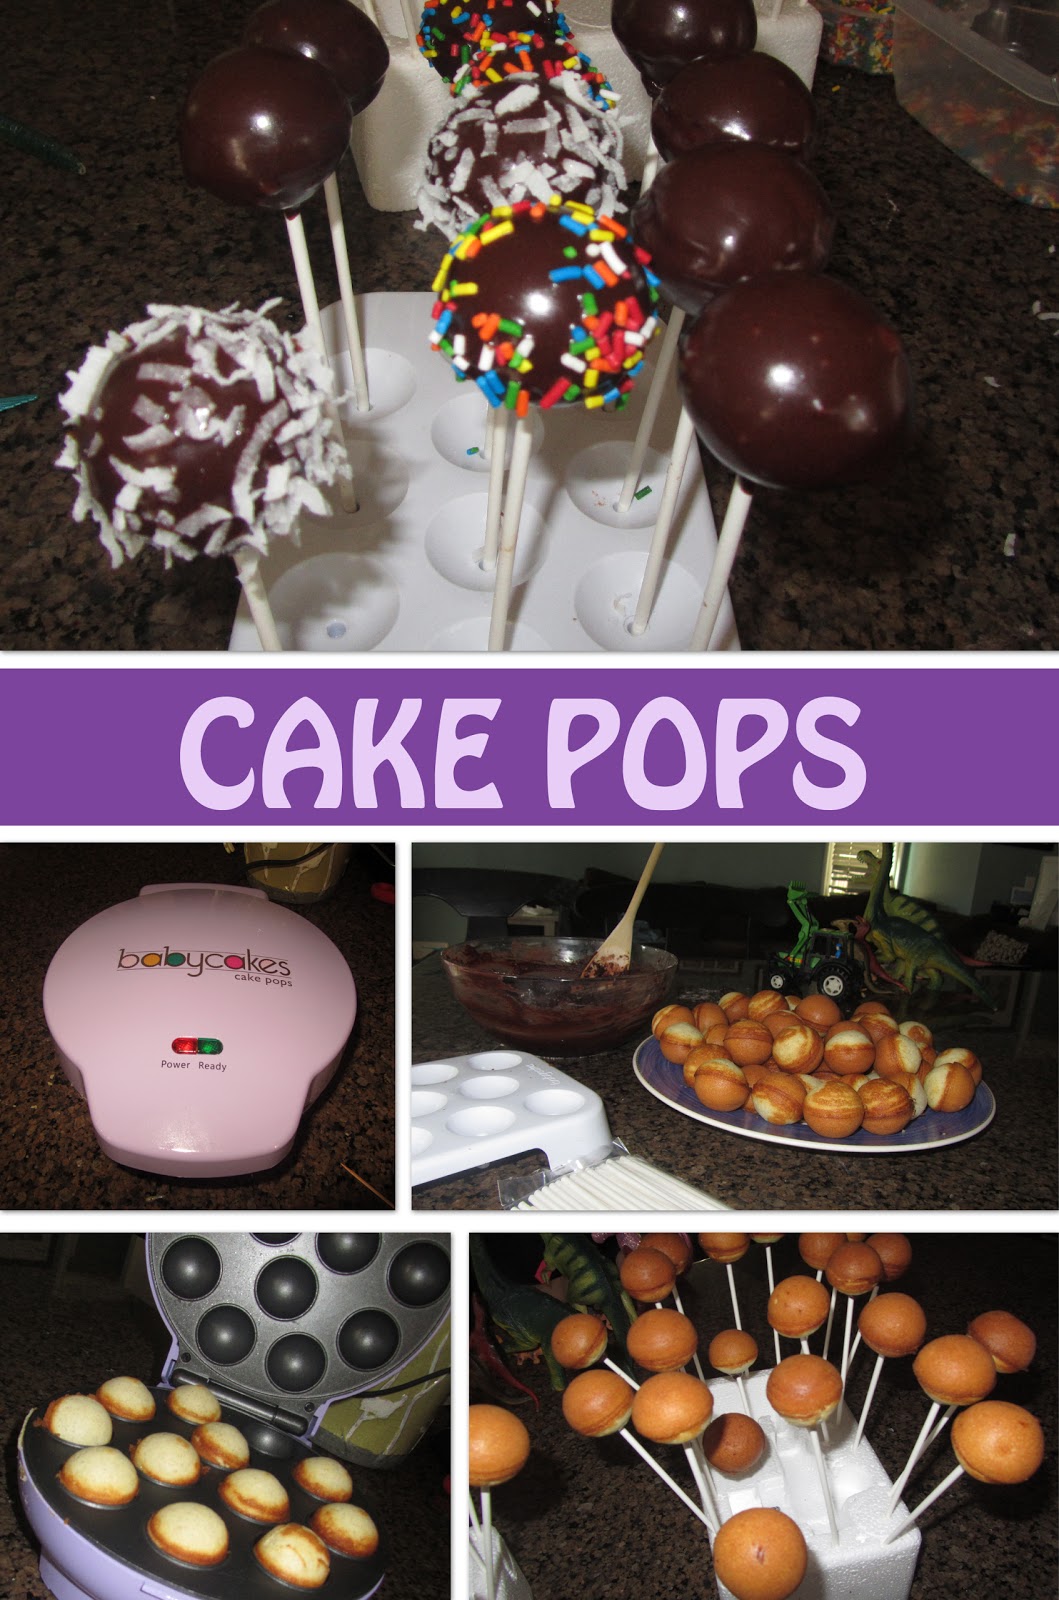
Trying out Cake Pops... Baby Cakes Pop Maker Review!

My Son Jude's 3rd birthday is in May and I wanted to make cake pops instead of cupcakes for the occasion. I haven't made cake pops myself but after watching a few You Tube videos on them. I thought to my self WOW that's alot of work.  Then while I was looking through a Khol's catalog they were selling the Baby Cakes Pop maker for $19.99 originally $29.99. Plus we had an additional 30% coupon! So we picked up this AWESOME find for $13.00

So before the big Birthday bash I wanted to perfect my skills at this little gem.  I used a box cake mix (Vanilla flavor) from trader joes as well as their chocolate cake frosting and semi sweet chocolate callets.  I mixed the frosting and chocolate together for my coating.


Here is what they turned out like. I now know what to tweek when I make these next time. I need better styrofoam bases to stick my stick's into. (I used the styrofoam from the box the pop maker came in :) I also think I need to use more chocolate callets in the next batter so they harden up better. Or first dip them in the frosting let them cool and then dip them in the chocolate.

All in all they turned out good. They tasted great but were still really time consuming. Dipping all the pops took the longest to do. 

...but My kids sure loved them!

Saturday, March 19, 2011

Homemade Playdough

Making your own playdough is super easy as well as safe for little ones in-case they put it in their mouths.

How to make it:
no cook recipe with my own variation... 
  • 1 Cup FLOUR
  • 1 Cup SALT
  • 1 Cup WATER
  • 1 pkg KOOL-AID MIX (any flavor/Color unsweetened) this is for smell and color not to eat.
Mix together in a large Bowl with your hands until pliable. If it still feels too sticky keep adding a little bit of flour at a time till it reaches the correct consistency. 

The benefits of play-dough:

  • Great for all ages. 
  • Helps to strengthen little fingers, hands and wrists.
  • Long lasting fun.
  • Great imaginative play- your kids can create anything - food, animals, bowls, shapes etc.
  • A great release for tension - by squeezing it through fingers.

Set up a Playdough table at your next birthday party. It is a great entertaining activities for everyone.

For more playdough recipe's check out this website. http://www.playdoughrecipe.com/

Monday, March 14, 2011

Turtle Shakers

SHAKE  .  SHAKE   .  SHAKE
This is a fun and cute craft you can do to make music shakers

I have always wanted to create something cute out of the little fruit cups my kids eat. 
Well here you go! 


MATERIALS NEEDED:
  • Three Green Pipe cleaners
  • Fruit Cup
  • hand full of Pasta shells (any kind)
  • Plastic baggy
  • green food coloring
  • hot glue gun
  • Green Paper (trace the bottom of your fruit cup and cut out the shape)
  • Scissors 
  • Googly eyes
  • Pencil
Lets Begin!
  1. First you want to take the pasta shells and put them in the zip lock bag. Add a few drops of green food coloring and shake! Open the bag and let them dry. 
  2. Take a sharp object and poke four holes in the side of your fruit cup. You want to try to make them opposite of each other. Then you want to poke two holes in the front side by side about a 1/4" apart. this is where the head will go. 
  3. FOR THE LEGS: Next let your child string the pipe cleaners through the holes to the other side. Be sure to leave the same about on each side. fold the pipe cleaner from the outside back in through the hole and twist them in the inside. Do that on all four sides. You can add a dab of hot glue where the hole and pipe cleaners meet so they don't swing, and the turtles legs stay sturdy. Fold the feet up.
  4. FOR THE HEAD: Next take a pipe cleaner and fold it in half. Poke one side in one hole and the other side in the other from the inside of the cup twist the two ends together. then you can hot glue your googly eyes on the face. 
  5. Take a few pasta shells and put them inside the cup. Be sure not to over stuff him or your pasta will not have room to shake. 
  6. Take the hot glue gun and glue along the edge of the bottom of your turtle shell, take your green circle shape and place it on top. 
  7. Emelia wanted a girl turtle so we added a flower to the top of her shell. You can decorate it or leave him as is. 

Tada it is done!  HOPE YOU HAD FUN!